

How To Setup A Wordpress Blog On Bluehost
Did you know that anyone can start a WordPress blog in the same amount of time it takes to enjoy a big cup of tasty coffee?
Yup, even if you have zero experience with blogging or websites, there's no need to make things harder than they have to be. At least, that's my view of things and that's what I'm here to help you with today!
So, first of all: congratulations for being here and getting this far!
If you want to start a WordPress blog on Bluehost today, you need two things:
You should have a great blog topic to write about and the perfect blog name figured out.
Now you just need an easy step-by-step WordPress tutorial to get your blog online for the world to see. In this post, I'll show you how! And as a little bonus, you'll even get access to a nice discount with Bluehost, too.
The best part?
I wrote this tutorial for absolute blogging beginners. If you feel like making a blog from scratch is super technical and complicated, don't worry. I've been in your shoes countless times and I know exactly how you feel!
And although we will go through a few small technicalities, I will walk you through everything step-by-step.
Because here's the deal:
When you start a WordPress blog, you want to make sure everything is setup the right way. I know you don't want your blog crashing just to spend sleepless nights trying to get it back online.
Therefore, by the end of this post, you will have a solid technical setup for your blog from the beginning for years to come. I use the exact same tools in this Bluehost WordPress tutorial for my own blogs so I know they work 100%.
That said, follow along and I will help you start your first WordPress blog on Bluehost today!
Disclosure: This page contains affiliate links, meaning I receive a commission if you decide to purchase using my links, but at no additional cost to you. Please read my disclosure for more information.
What do I need to get my blog online?
In short: all you need to start your own blog is:
- Hosting plan – this is the web server where all of your blog files and data are stored.
- Domain name – what people type into their browser to find and visit your blog.
- Blogging platform: WordPress – the software you will use to build and manage your blog.
Even if you're not sure what these are, no worries. We'll go through each of them step-by-step, just tag along!
Getting started: Blog hosting and domain name
If you have never started a blog or launched a website before, you are probably wondering:
What the heck is blog hosting?
A blog hosting provider is like the landlord for your blog. You hosting provider gives your blog a virtual space to "live" on.
Also, they allow you to get a domain name for your blog.
You domain name is simply the web address for your blog website that people type into their web browser.
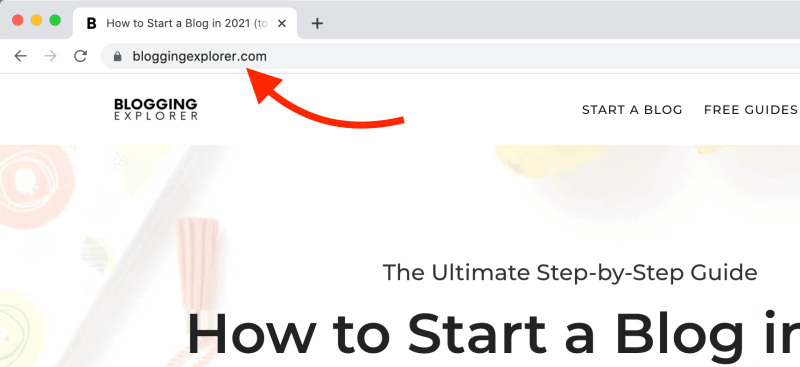
For Blogging Explorer, my domain name is:
bloggingexplorer.com
If you're not sure which domain name to register, don't worry. You can sign up for blog hosting today, start preparing your blog strategy, and register your domain name for free any time later on.
So how does blog hosting work exactly?
When you sign up with a blog hosting provider, they let you set up your blog on their web server, so that people from all over the world can access and visit it 24/7.
"Web server" is simply a fancy name for a computer that can make your website accessible for everyone.
When it comes to blog hosting, there are three things you want:
- Easy but reliable technical setup:
You don't want to spend hours with complex setups on your hosting – you're here to blog! - Reliability with uptime:
Your blog needs to be up and running 100% of every month, day, and hour. - Fast page loading speed:
The average amount of time it takes for your blog page to load.
All of these will help you save time and make more money with your blog.
When your WordPress blog runs smoothly, your visitors will spend more time consuming your content. That means more conversions, more blog income, and more loyal readers.
And when you don't have to worry about a poor technical setup, you can focus on what matters the most: creating even more valuable, helpful content for your community.
But if you are completely new to blogging, how can you find the best blog hosting provider?
This topic is a tad technical, so I know you may not feel too comfortable with the terminology at this point. Let me walk you through a few helpful tips next.
Which hosting provider should you use in 2022?
There are hundreds of blog hosting providers to choose from. It gets overwhelming for any beginner, I know.
So, to help you save time (and money!), I've done the research for you.
I've made my fair share of mistakes trying to find the perfect hosting for my blogs and websites. A couple of them cost me a ton of money and I lost a few big clients, too. (Ouch!)
Let me show you how you can make sure you won't run into any technical trouble with your blog.
Of course, you're free to choose another hosting provider than what I recommend. You'll find several ones that are perfectly OK.
My recommendation is simply based on my experience and what's worked the best for100% of my blogs and websites.
To spare you from repeating my mistakes and spending hours and hours after a crash to get your blog back online with no help from a poor hosting provider, here's what I recommend:
I use and recommend Bluehost for domains and blog hosting.
Why?
Because their blog hosting is super easy to set up, their service is top-notch, and the plans are really affordable.
Even if you are entirely new to blogging, you can start a blog on Bluehost in just 10 minutes!
They even install the WordPress blogging software automatically for you. You literally just need to sign up and you can start blogging right away.
Why Bluehost is my #1 recommendation for blog hosting and domains:
Having tried a myriad of different hosting providers (learning my lessons from each one of them!), here's why I nowadays use and recommend Bluehost:
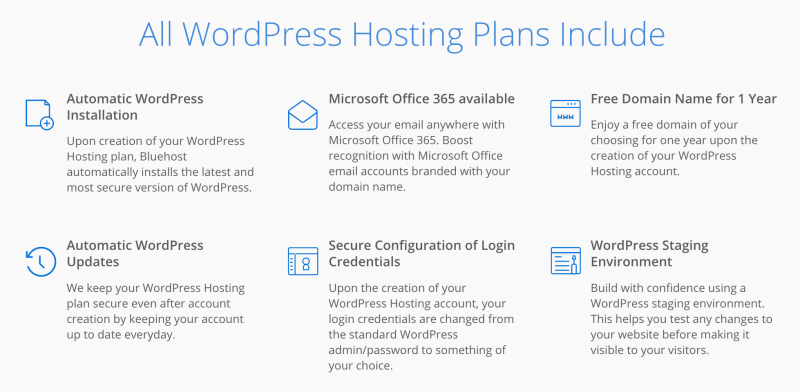
- FREE domain name for your blog:
Other providers usually charge $10-20 a year. With Bluehost, all you need is a great blog name! - Their plans are super affordable:
Choose the right hosting plan for your blog website without breaking the bank. - Easy and quick sign-up:
I'll show you how it works in just a second. - No hidden costs:
No hidden fees when you sign up. - Free, automatic WordPress installation:
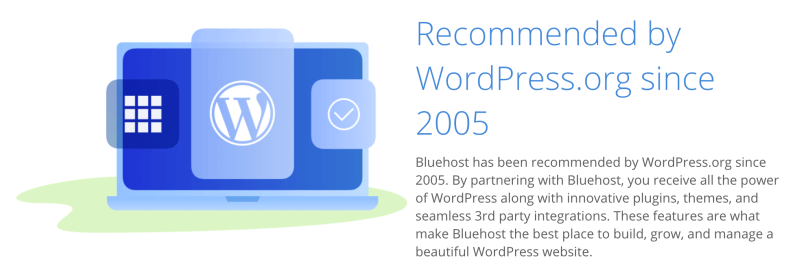
That's the blogging software you should use. No technical jargon or hassle, just start blogging right away. - Recommended by WordPress:
Yes, even WordPress itself recommends Bluehost as a trusted hosting provider. - Free email accounts:
Create custom email addresses with your blog name, like this: yourname@yourblog.com. - FAST and friendly 24/7 support:
I've waited1.5 seconds on average for a support agent to join the helpdesk chat. Plus, they solve my problems without speaking in jargon I don't understand. - 30-day money-back guarantee:
No questions asked if you choose to cancel your account for any reason.
In short: with Bluehost, there really is no risk.
If you want to build a profitable blog, they give you all the tools you need at a super affordable price.
And it gets better…
Exclusive blog hosting deal for my readers:
I know you don't want to invest more money than necessary into getting your blog on its feet.
That's why I've negotiated an amazing deal for all my readers with Bluehost:
With Blogging Explorer, you get access to an exclusive blog hosting package starting at $2.95 per month !
That's a massive 60% discount – and it's less than a coffee at Starbucks!
This is the exact same blog hosting I use – and I really can't recommend them enough!
Ok, enough with the shameless sales pitch…
So, now you got your domain name and web hosting sorted. Awesome!
Next up: blogging platforms and software.
When it comes to blogging platforms, I recommend using WordPress.org for creating your blog.
If you aren't familiar yet, WordPress.org is the most popular blogging platform or Content Management System (CMS) worldwide.
It's simply a piece of software you use to manage your blog website, write your blog posts, and much more.
The WordPress dashboard is simple enough for even complete beginners to get familiar with. You can learn the basics in a few minutes! I will come back to that in a few minutes.
Moreover, WordPress is extremely customizable once you feel comfortable enough with it. You can literally build anything with WordPress with easy-to-use design tools and customization options.
I use WordPress for all my websites and blogs – and so do millions of others. WordPress powers a whopping 38% of all websites worldwide!
It's the best tool for starting your first blog, trust me. If you follow along, you will have a WordPress blog up and running in 10 minutes.
Let's get started with our Bluehost WordPress tutorial to start your blog now!
Bluehost WordPress Tutorial: How to start a WordPress blog in 10 minutes in 2022
This Bluehost WordPress tutorial will take just a mere 10 minutes.
Make yourself a cup of coffee and let me walk you through six easy steps to get your blog on its feet by the time your cup is empty!
If you want to finish this blog setup tutorial later, just save it for later!
Here's a pretty picture you can pin right away 😉
Step 1: How to get a Bluehost hosting account
First of all, click here to get to Bluehost to get started.
The page will look like this:
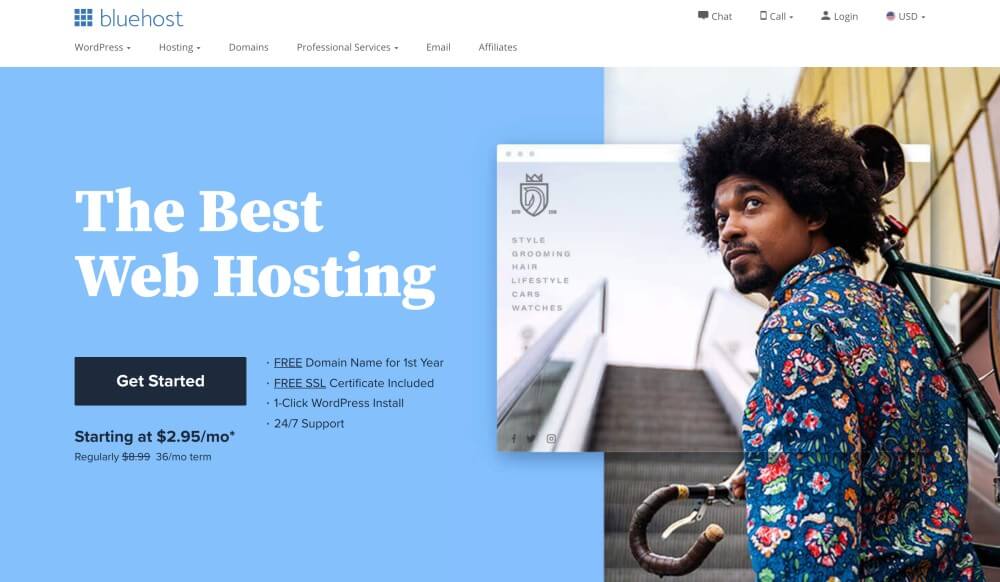
Once you're there, click that beautiful blue button that says "Get Started".
On the next page, you'll see the following web hosting plan options to choose from – Basic, Plus, Choice Plus, and Pro:
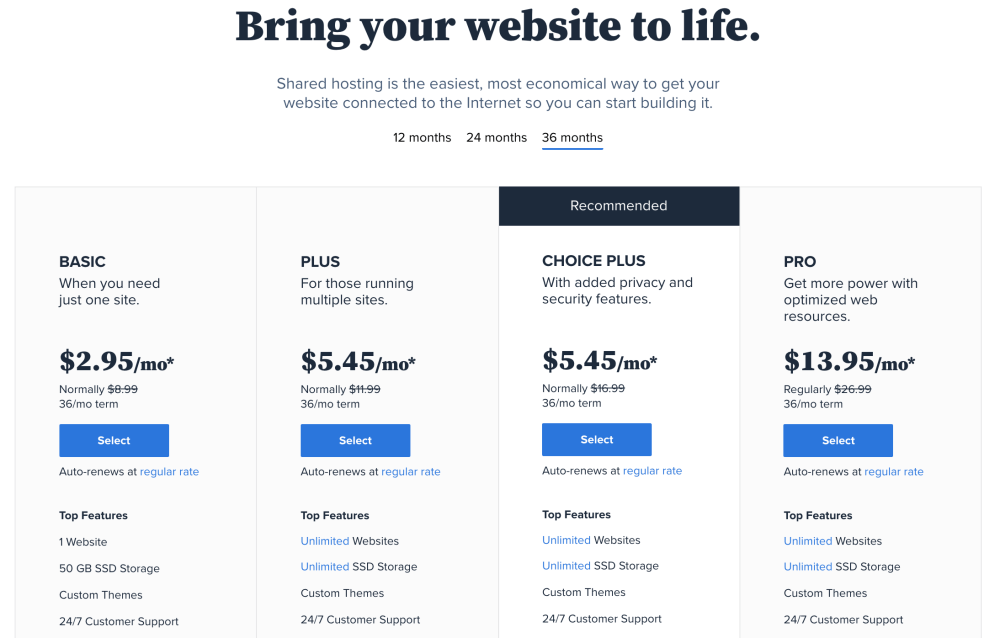
When you are just starting out with your first blog, it's perfectly OK to pick the Basic plan.
Choose the Basic plan if you're on a budget and you're not expecting to earn that much with your blog just yet.
That's what I did when I started blogging and the plan had all the tools I needed to grow my blog into a profitable business. You can always upgrade later if you need to.
Now, I know that this initial investment in web hosting may seem like a big buck.
When I started building my first online business, I was on a super tight budget. I didn't want to spend all this money on technicalities (that I didn't even understand that well at that point!).
But here's the deal:
That first online business took off like a moon rocket! I earned back my investment in a matter of weeks.
I made my first $65 in affiliate commissions just 2 days after I launched my blog. It was the best feeling ever!
Thus, this is a small price to pay for the potential you will unleash with an online presence. It's simply a necessary investment, enabling you to make that money back with your blog or business soon enough.
So, once you've chosen a web hosting plan (Basic, Plus, Choice Plus, or Pro), click "Select" and you'll land on the next page, where you can choose your domain name.
Step 2: Register a FREE domain name for your blog
Now for the more exciting part of starting a blog with Bluehost: your blog name!
On the next page, you can choose the domain name for your blog. If you haven't chosen one yet, don't worry. Simply skip this step by clicking "I'll create my domain later" at the bottom:

If you have domain name for your Bluehost WordPress blog in mind, you can register it for free where it says "Create a new domain":
Type your domain name into the field and click "Next".
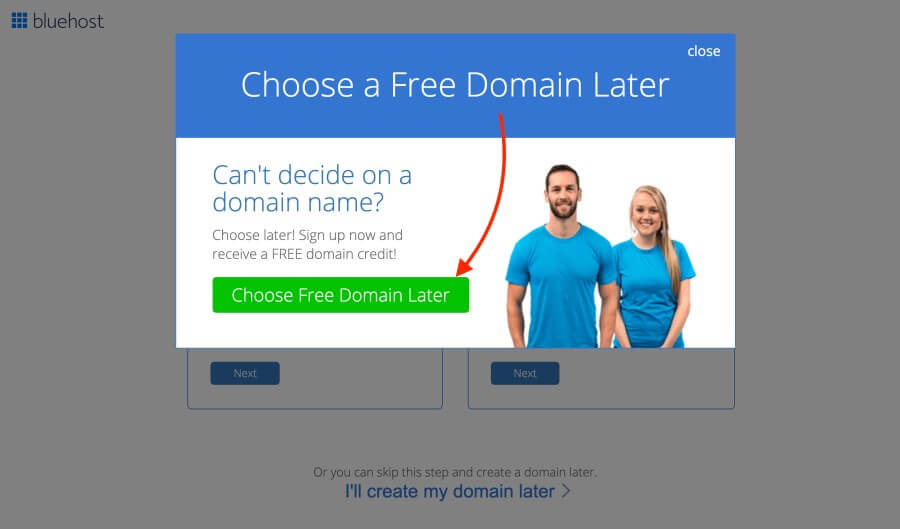
If your domain name isn't available, try another option that comes to mind – or select the option to choose your domain name later after getting your hosting account set up.
That way, it's easier to take time to think your name through. Simply click "Ill create my domain later" at the bottom of the screen.
If you stay on this page for long enough or move you mouse toward the top of the page, you will see this popup where you can click on "Choose Free Domain Later":
After picking your domain name or choosing to select it later, you will be taken to the final step to finish your Bluehost signup process.
(I told you this would be easy!)
Step 3: Finish your signup and registration
Here's how the page looks where you will enter your details to create your Bluehost account:
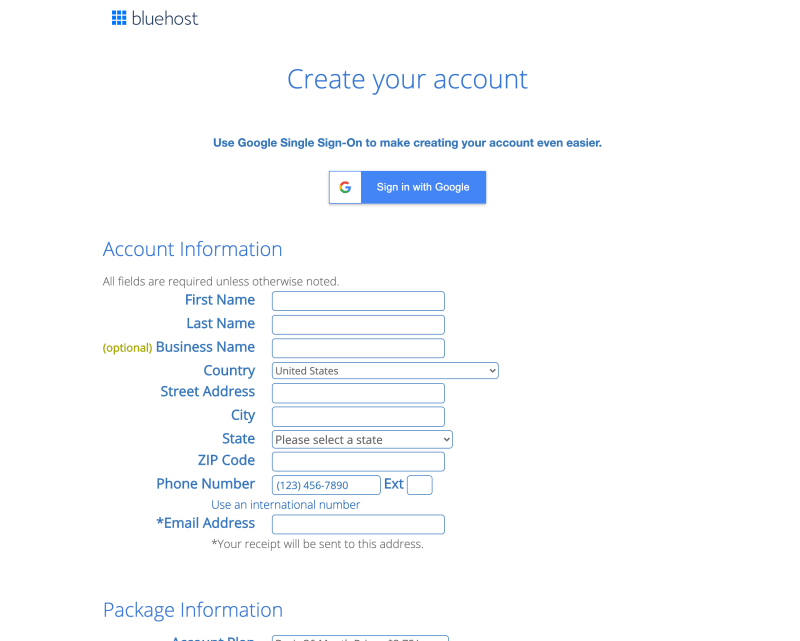
Create your Bluehost account
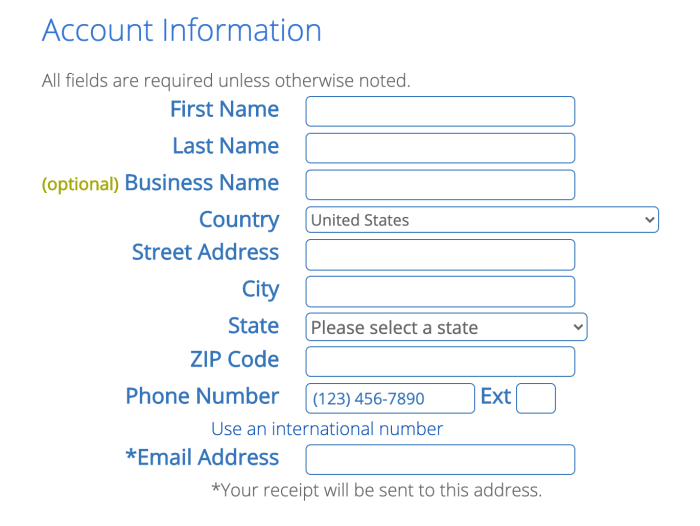
First, fill in your account information. Make sure you use your best e-mail address because that is where your login details and account information will be sent:
Select the best hosting package
Second, choose the duration of your Bluehost web hosting plan:
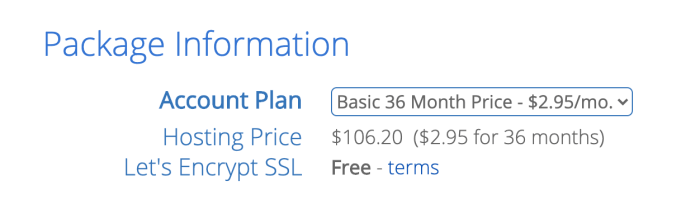
Choosing a longer plan allows you to lock in a lower price, but you will pay everything in advance.
Which pricing plan is best to start a blog with?
I recommend choosing the 36 Month Price if you want to lock in the lowest price possible for your hosting.
That's what I selected to secure the insanely low price for as long as I could.
The 36-month plan allows me to run my blog for $2.95 a month for three whole years, and I will start paying the full price in my fourth (!) year of blogging.
I always recommend going with the longest plan that's within your budget. The initial investment is higher, but you will save money in the long run.
Choose your package extras
Thirdly, you can choose some additional services for your blog under Package Extras:
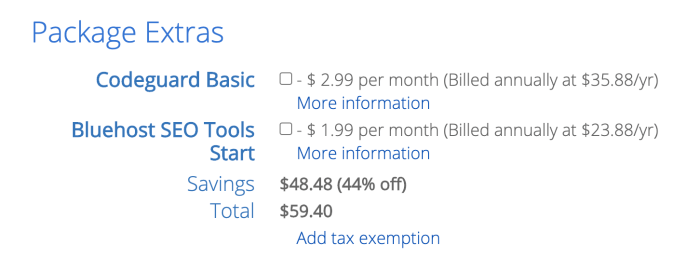
Now, if you ask me, you don't necessarily need any of them.
The price can go up quite a bit if you choose to buy some, so the decision is yours.
Click "More information" below each point to learn more about them.
- Codeguard Basic is a tool for backing up your blog website. If you happen to delete some blog posts, for example, you can easily restore them.
- Bluehost SEO Tools Start helps you optimize your blog for search engines. You will most likely get more visitors to your blog with these tools, but you don't really need them at this point.
(In general though: if you don't understand what an extra service means, don't buy it.)
I didn't choose any extras for my plan. I'll show you how to back up your blog for free in a minute. Also, I'll share my best SEO tips at the end of this guide.
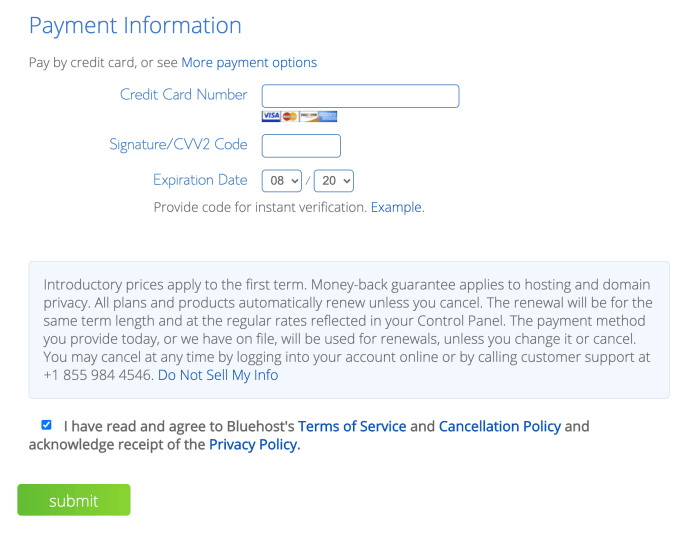
Enter your payment information
Finally, just enter your payment information, read and accept the terms, and hit "Submit":
Congratulations!
You're now officially a happy member of the Bluehost community with your very own domain name and web hosting plan!
Good job! Welcome to the family!
Next, let's walk through the final steps of the WordPress installation so you can start your WordPress blog on Bluehost right away.
Step 4: Log in to your Bluehost account
Luckily, Bluehost nowadays installs WordPress automatically on your account during the signup process. So there's not much left to do here, really.
Let's just finish up the signup and log you into your Bluehost WordPress blog right away!
Once you complete your payment, you will see a warm welcome message from Bluehost:

To get started with your WordPress blog, click on the bright green button that says "Create your password".
On the next page you need to set your password for your Bluehost hosting account:

Type in your desired password and click "Next".
And you know what? You're done!
That's right – your WordPress blog has now been installed in the background and you can start creating content right away!
Choosing a WordPress theme for your new blog:
In the next screen, though, you can choose a WordPress theme for your blog already if you wish:

If you're not quite sure about it yet, simply skip the step at the bottom of the screen.
For more details on themes, check out my article on how to find the best theme for your new Bluehost WordPress blog.
And for a few of my top picks, check out my blog post with the best WordPress themes for bloggers (free and paid).
Opening your Bluehost account dashboard:
Finally, you will land in your Bluehost account dashboard. Here you can manage your sites, domains, and other settings:

You see your brand new WordPress blog right there in the center of the screen. Click on the blue button that says "Log in to WordPress" to access your WordPress blog.
Step 5: Set up your Bluehost WordPress blog
Now that you have all the technicalities set up, you can take a deep breath and sit back.
Your domain name and blog hosting are all set (for years to come).
Now is the perfect time to start getting more familiar with your daily and weekly blogging tasks.
At the end of the day, successful blogging is all about planning and creating content and connecting with your readers. As long as you stay consistent and help your visitors with useful blog posts, you're on the right track.
So, to help you get started the right way, this final part of our Bluehost WordPress tutorial will help you set up your new blog quickly and easily.
I'll share with you a few helpful tools you want to use to make things easier for you and to save heaps of time in the long run.
Access your WordPress blog dashboard:
To start blogging, simply click "Log in to WordPress" in your Bluehost account dashboard to get going with your awesome new WordPress blog:
Alternatively, you can access your WordPress website by typing in your domain name into your web browser using your personal URL and adding "/wp-admin" to it. So, if your domain is "yourblog.com", simply type
http://yourblog.com/wp-admin
into your browser's address bar.
Hit Enter and you will be taken to the login screen of your WordPress blog:

Simply enter your login details, click "Log In", and there you go!
If you're not sure what your WordPress blog username and password are, don't worry. Just check the email that you just received from Bluehost for your login information:

Open your WordPress blog dashboard:
Once you've logged in, you will see the WordPress Dashboard or "admin area".
This is where you will be working a lot, so you might want to bookmark this page to find it more easily any time:
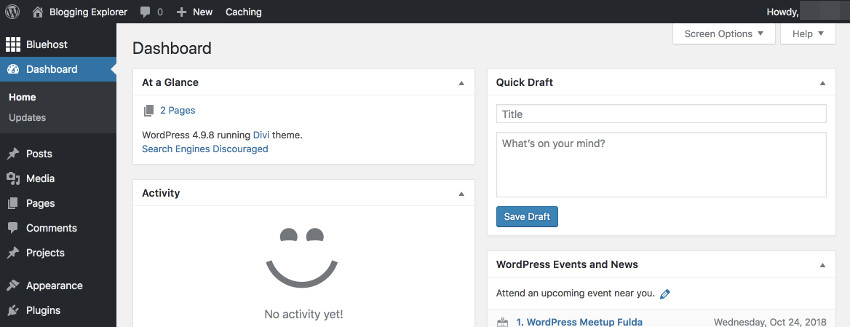
Your WordPress dashboard is where you do all your blog work in the future. It's not visible to your readers, but you will use it for all your daily blogging tasks.
Here are a few key features to help you navigate the left-hand side menu of your WordPress admin area:
- Posts:
Write, edit, view, and manage your blog articles. - Media:
Upload and manage your photo and video files you'll use in your blog posts and pages. - Pages:
Create and customize your individual pages, like Contact or About Me page. - Comments:
View, approve, and manage all comments from your readers to create a lively discussion on your blog! - Appearance:
Find, install, and configure new WordPress themes to customize the design of your Bluehost WordPress blog. - Plugins:
Plugins help you add new features to your blog, such as contact forms, nifty SEO tools, security and backup tools, and much more.
Phew! I know it's a lot to take in at first, but just keep it cool and explore your dashboard one thing at a time.
Since this is a tutorial on how to start a WordPress blog on Bluehost, let's see how you can create your first blog post next.
Here are a few related posts you might want to read:
- How Much Does It REALLY Cost to Start a Profitable Blog?
- 4 Profitable Blogging Investments You Need to Make to Start a Successful Blog
- 9 Critical Reasons You Want to Start a Self-Hosted Blog
Step 6: Write your first blog post in WordPress
This is the point where I always feel super excited about my brand new blog!
Because the thing is:
You are about to write and publish your first blog article!
And don't worry, it doesn't have to be anything super long or complex. Since it is your first post, I suggest you write something about yourself.
Sharing a few things about why you are starting this blog and what you want to achieve makes for an awesome first blog article. Just be yourself and let your readers get to know you a bit better.
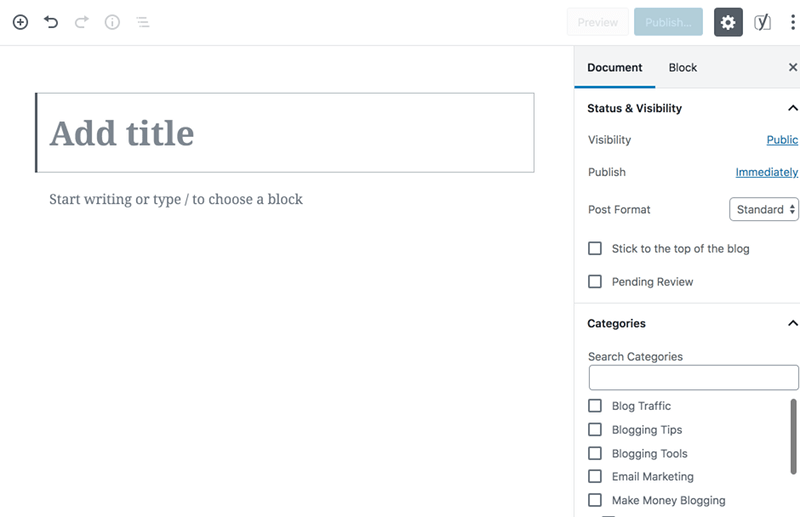
1: Open your blog post editor
To get started, open your WordPress dashboard.
There, navigate to Posts > Add New:

This will open the standard WordPress blog post editor that looks like this:
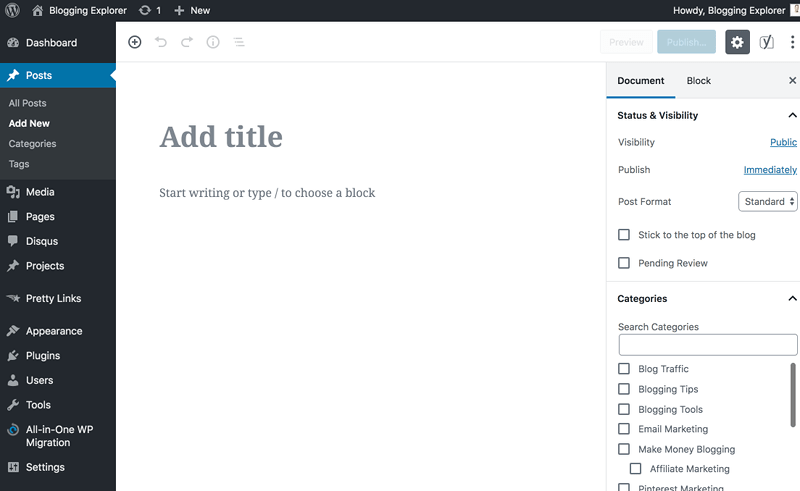
Now, this interface is packed with different tools, yet again. Let's look at a few key features you may want to use.
2: Choose when to publish your blog post
On the right-hand side, you'll find an option for Publish. By default, it's set to Immediately:
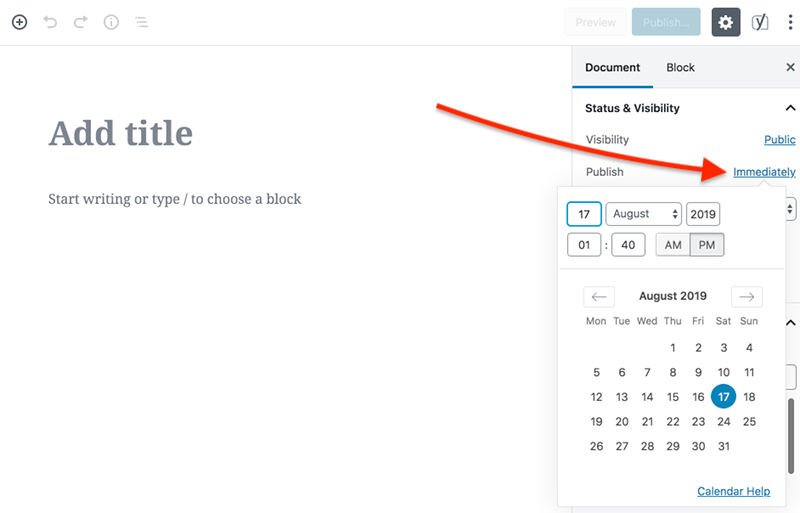
This means that when you click on the blue Publish button in the top right corner of this editor, your blog post will become visible to your readers right away.
If you want to schedule your post to be published later, just click on where it says Immediately and pick a date and time from the calendar. Now your blog post won't go live before the time you selected. Neat!
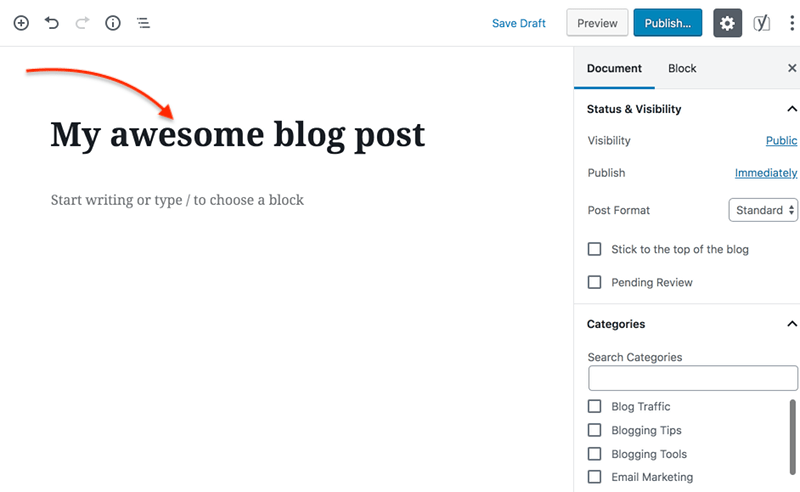
3: Add a blog post title
Every blog post needs a catchy title!
To add a title to your article, select Add title in the editor and type in whatever you feel suits your post best:
Of course, your first blog post will be nothing but awesome. Here's how your title would look:
4: Add paragraphs and headings to your post
Right beneath the blog post title, you have a field where you can start writing or typing your first paragraph.
The editor is super intuitive and you will start feeling comfy with it after you have written a few posts, trust me.
Just keep your paragraphs and sentences short to make your post easy to read.
Headings are another great way to break up your text and making it more readable. Let's try adding a heading element next.
In your editor, hover your mouse below your first paragraph. You will see a toolbar pop up, yay!
On the right-hand side, choose Add Heading:
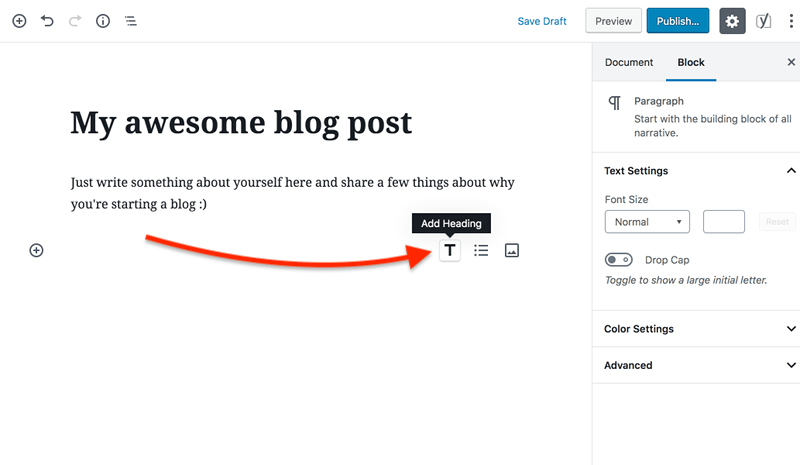
Ta-dah! You'll see this particular block turn into a heading element.
Headings come in a few different shapes and sizes: H2, H3, H4. You'll see these options when you're writing your heading:
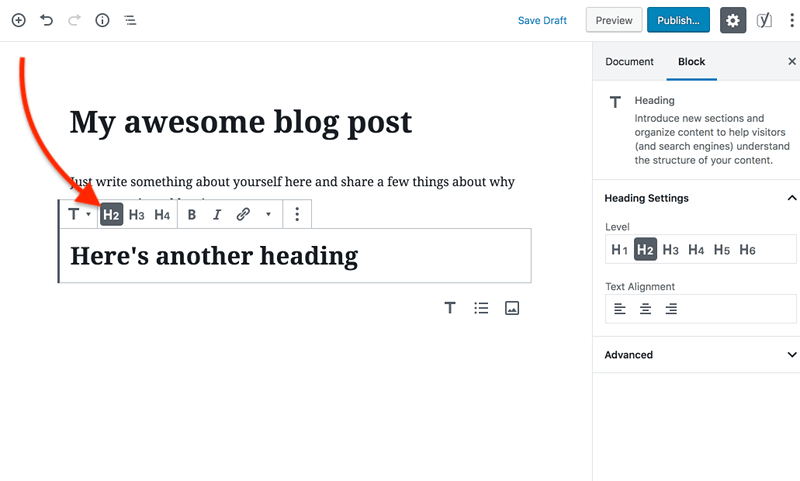
You can think of headings as a tool for creating something of a hierarchy in your blog post.
Your blog post title at the top is the H1 for your article. That's the biggest, most important heading.
Then, within the body of your blog post, you can use headings that are lower in the hierarchy: H2, H3, and H4.
Tip: Use H2 elements for sections that are equally important. Inside those H2 blocks, you may want to use H3 and H4 headings for breaking up your text.
5: Format and style your paragraphs
The WordPress blog post editor comes with a few easy tools for styling your text. When you're inside a paragraph element, you'll see a toolbar with a few options:

- "B" stands for bold – use it to highlight individual words or sentences
- "I" stands for italics – great for emphasizing individual words
6: Add links to your blog post
The link symbol allows you to turn the selected word into a hyperlink.
For example, if you want to share a useful resource with your readers, you can easily link to an external website from your blog post.
To add a link, select a section of your text and click on the link symbol in the toolbar. This will open a field where you can enter the hyperlink to the website you want to link to:
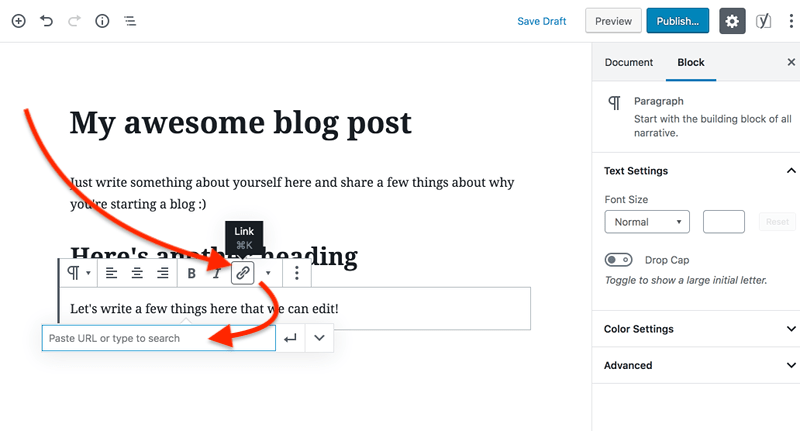
Simply paste the URL into the field and hit Enter to save the link.
7: Add images and media to your article
What would a good blog post be without a few beautiful images, right?
Adding a few relevant and helpful images makes your blog article more readable and interesting to look at.
To add an image to your first WordPress blog post, hover your mouse under your last paragraph again. On the right-hand side, you'll see a button to Add Image:
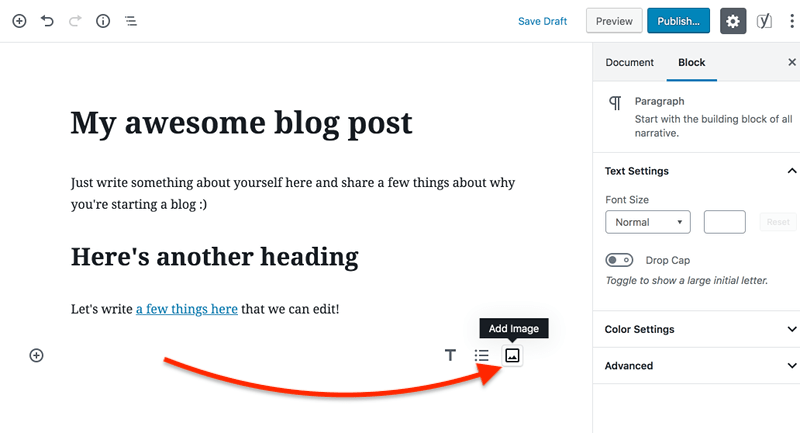
Clicking the button will add an image block to your blog post editor. Here, you can choose to either upload a new file, choose one from your Media Library, or insert an image from a URL:
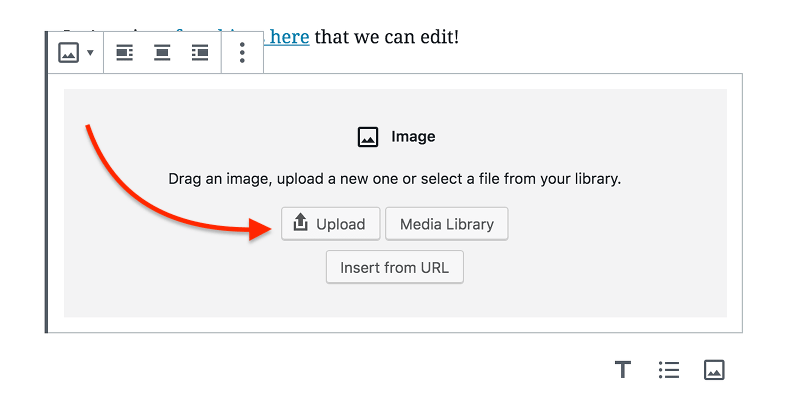
Let's click Upload. This will open a new interface where you can drop your image files or select them from your computer:

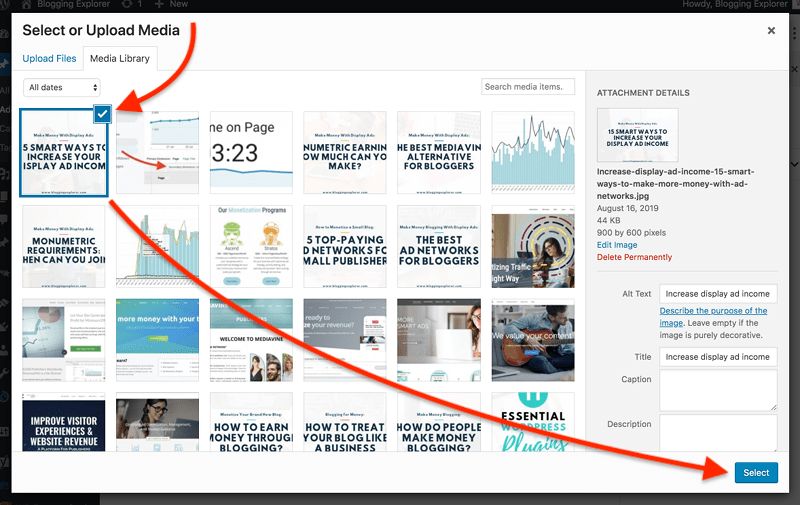
If you choose to add an image from your Media Library, you will be taken to an overview with all the image files you have uploaded to your Bluehost WordPress blog so far.
Here, just click on an image to highlight it. Then, add the image to your blog post by clicking Select in the bottom right corner:
Nice job!
Feel free to add a few paragraphs, headings, and media files to finish your first WordPress blog post.
Try out the different formatting tools and don't be scared if something goes wrong! You can always add new text blocks and delete ones that you don't need anymore.
When you feel like you're finished, you'll find a blue Publish button in the top right corner of your WordPress blog post editor.
Hit the button to share your very first blog post with the world!
You have come a long way already! Congrats!
These essential WordPress tools will help you get started with your Bluehost WordPress blog. So, you are off to a great start – and this is just the beginning!
If you are looking for some inspiration for your first articles, check out my post on how to find awesome blog post topics that will generate massive traffic.
And to get your writing done faster, check out my favorite tips for writing blog posts faster.
Adding new features to your blog with WordPress plugins
Before we wrap up this guide on how to start a WordPress blog on Bluehost, let me show you how WordPress plugins work.
WordPress plugins are add-ons you can install directly in your WordPress dashboard.
You can think of them as apps that add a new feature to your blog.
For example, if you want to add a contact form to your Contact page, you can install a plugin to get the job done.
Thus, plugins are extensions that give your blog a functionality it wouldn't otherwise have.
1: Before you start using WordPress plugins
Now, before you start using plugins in WordPress, there are a few things you must know
I don't mean to scare you or anything, but you need to be careful when finding and installing new plugins.
For instance, using too many of them may slow down your site. So, keep the number of plugins to a bare minimum to keep your readers happy.
Also, keep in mind that anyone can create and publish a plugin in the WordPress plugin directory.
Needless to say, the quality varies a lot. Some plugins are built by large teams of professional developers, while others come from independent hobby programmers.
Therefore, when you are new to WordPress, it's a good idea to pay attention to the ratings and reviews for any plugin you intend to use.
Here are a couple of helpful tips for you:
- Only use plugins you REALLY need:
Since they are so easy to install, a lot of bloggers use plugins simply because "they're nice to have". Don't make this mistake. - Clean up your plugins regularly:
Once a month, go through your list of installed plugins. Are you still using all of them actively? Get rid of any plugins you don't need 100%. - Update your plugins weekly:
Whenever developers add new features and release a new version of a plugin, you should update it to the latest version. - Backup your website before updating:
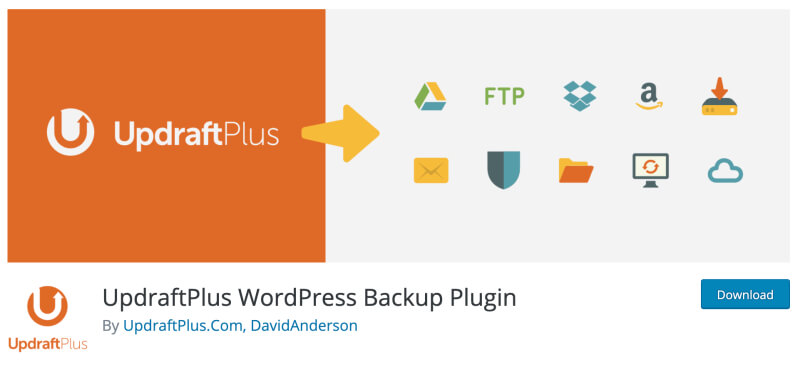
Sometimes plugin updates can cause problems on your blog. Therefore, use a free backup plugin such as UpdraftPlus to create a copy of your WordPress website before updating anything.
2: How to search and install WordPress plugins
There are thousands of free WordPress plugins you can choose from.
You can search, browse, and install plugins directly in your WordPress dashboard. Simply navigate to Plugins > Add New to get started:

Here in the WordPress plugin directory, you can easily search for a specific plugin with a keyword.
In the search field on the right, type in the name of any plugin you want to install:
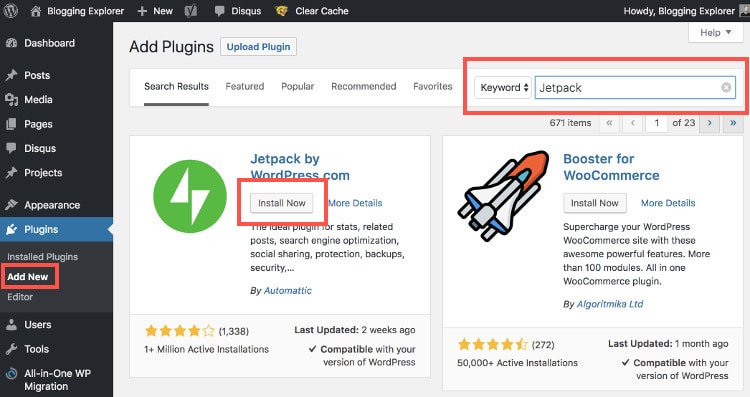
Next, once you find the plugin you are looking for, click on the Install Now button to install it right away.
(While the installation is running, do NOT leave this page.)
When the installation is complete, the button now says Activate. Go ahead and click on it to activate your plugin.
You can now navigate to Plugins > Installed Plugins in the left-hand side menu to manage all the plugins on your WordPress blog.
3: Must-have WordPress plugins for bloggers
With so many plugins to choose from, I know it may feel overwhelming to know which plugins you REALLY need.
To help you get started, let me walk you through a few of my favorite plugins.
These are the tools I have used for years to make blogging easier and faster for myself.
All of the plugins below are free to use. Some of them offer a premium version with additional features, but it's perfectly OK to use the free version for now.
With that said, these are the WordPress plugins I recommend you install when you start a WordPress blog on Bluehost:
- Akismet will filter out and block all spam comments on your blog.
- Yoast SEO helps you optimize your blog posts and pages for Google and other search engines.
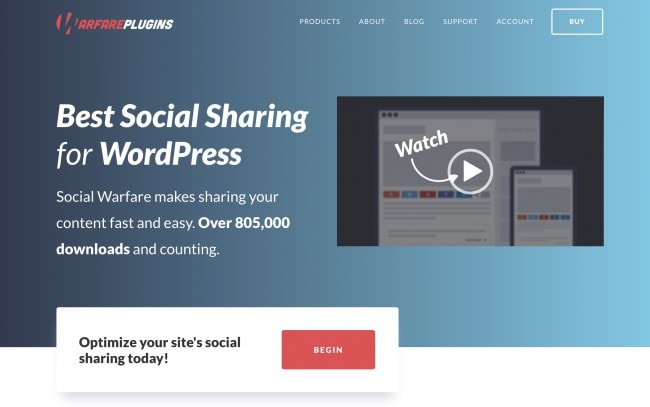
- Social Warfare is THE plugin to make your blog posts easily shareable on social media.
- Google Analytics Integration for WordPress adds a nifty widget to your WordPress dashboard to see what your visitors are doing on your website.
- Wordfence Security will guard your blog against hackers and malware even while you're asleep.
- Updraftplus helps you backup your entire site regularly. Although making backups isn't fun, always keep a recent backup of you blog at hand!
For more tips on finding, using, and managing plugins like a pro, check out my full guide with the best WordPress plugins for bloggers.
General FAQ: Bluehost WordPress tutorial in 2022
How do I start a WordPress blog in 2022?
If you want to start a blog in 2022, here's an easy step-by-step guide to follow:
1. Sign up for web hosting (I recommend Bluehost).
2. Choose your blog hosting plan.
3. Pick a domain name for your blog.
4. Finish your registration with Bluehost.
5. Wait for the automatic WordPress installation to finish.
6. Log in to your WordPress dashboard and write your first blog post.
Is Bluehost good for blogging?
Bluehost is the best place to start your first blog in 2022 because of their beginner-friendly interface, easy sign-up process, and excellent customer support. Moreover, you will receive a free domain name for the first 12 months, giving you great value for your money. Also, Bluehost is the recommended blog hosting provider by WordPress itself, the best and most popular blogging software worldwide.
Is WordPress really free?
Yes. WordPress.com and WordPress.org are two different versions of the same software. WordPress.org is an open-source software you can download and install on your web hosting account and use to build and manage your blog or website. WordPress.com is a freemium website where you don't sign up for blog hosting but you also don't own your blog website or domain name.
Does WordPress cost money with Bluehost?
No. WordPress is 100% free to use with Bluehost. The only thing that costs you money with Bluehost is your web and blog hosting plan. If you want to start a blog on a low budget, a domain name typically costs $10-15/year and blog hosting costs $8-10/month. However, Bluehost offers my readers a free domain name and an exclusive hosting deal starting at $2.95/month.
How much does it cost to start a WordPress blog?
Depending on your goals, starting a WordPress blog can cost anything between $100–$10,000. If you are on a budget, you can start a WordPress blog for as little as $40/year, which covers the bare minimum of web hosting and domain registration. But if you want to hire a professional web developer, your cost to start a WordPress blog website can range between $1,000 and $10,000 or even more.
How much does Bluehost cost per month?
A shared hosting plan on Bluehost costs between $7.99 and $23.99 per month. Bluehost offers discounts of up to 65% when you sign up for 12, 24, or 26 months. Their VPS hosting plans start at $29.99 per month, and dedicated servers are available from $119.99/month.
Final thoughts: How to start a WordPress blog on Bluehost in 2022
First of all, congrats for getting this far! You should have a clear idea about how to start a WordPress blog on Bluehost in 2022 step-by-step now.
The most important thing at this point is to have the technical steps all set up. If you followed through this Bluehost WordPress tutorial, you don't have to worry about technical issues.
You have a fully-functional blog for years to come and you can start creating awesome content for your readers now!
I know it's a lot to take in. But knowing how to start a WordPress blog and how to write your first blog post is all you need to know at this point.
Thus, take some time to navigate through your WordPress dashboard and explore the blog post editor we looked at above. That's going to be your #1 tool for writing great articles to generate traffic and to monetize your blog in the future.
This will be an awesome journey and I'm here to guide you through it! I'll make sure that you'll have a smooth ride all the way.
If you want to learn more about my blogging journey, check out my article on how I make over $3,000 a month blogging.
Now I want to hear from you!
Share your thoughts in the comments below! Let me know what's inspiring you to start a blog!
Also, feel free to share your feedback about this Bluehost WordPress tutorial. Did you find it helpful? Is there anything I can help you out with?
There ya go! Please share this post with others so that they can find it, too! Thanks!
Here are a few helpful articles you may want to read, too:
- How to Start a Successful Blog? 6 Essential Steps for Blogging Beginners
- What to Blog About? How to Find Blog Post Topics That Generate Traffic
- The Best WordPress Themes for Blogs (Free and Paid)
P.S. If you enjoyed reading this post on how to start a WordPress blog on Bluehost, drop me a line in the comments below!
See you soon, happy blogging!
– Mikke


How To Setup A Wordpress Blog On Bluehost
Source: https://bloggingexplorer.com/how-to-start-a-wordpress-blog/
Posted by: yosthister.blogspot.com
0 Response to "How To Setup A Wordpress Blog On Bluehost"
Post a Comment